Cycling is something I have been doing recreationally now for about 6 years. As a kid I rode my bike everywhere as well, and because I grew up in the country, all my neighbors were at least half a mile away. This meant I put up some pretty serious mileage on my huffy over the years.
3 years ago, my wife bought me a bike trainer for Christmas so u could get in some winter training miles before the spring hiking season. This was the first year I had really taken on road biking seriously, and I would need a number of base miles in the saddle to get used to the whole thing.
This winter I am giving the spin classes at the gum a shot rather than using the trainer. It's fun to share the experience with others rather than sweat it out alone in the basement at my house.
It's really taking some getting used to. Here are three things I am picking up after about a month of spinning three days a week.
1. Get to class early. Bikes fill up quick, and arriving at the gym in your bike shorts without a bike makes for some head turning while you lift in the weight room.
2. Get your bike settings figured out. Just like on the road, each notch of adjustment can make you feel sore or cramped afterwards. Find what works for you, and make sure you have time to set it up that way every time you go to class.
3. Figure out your standing resistance settings vs. seated settings. Typically, when the class instructor has us get up out of the saddle, I have to turn up the tension knob 1.5 to two full turns. Then when we sit, I ease it back so I can spin. This is something I don't see many people doing, but to me, it is the only way to simulate riding outdoors.
Any other ideas?
I am a fairly active person. I ride my bike 4 miles each morning to work regardless the weather, and spend most of our family days out hiking, exploring, biking, or just adventuring together as a family.
One thing I have never been good at however is going to the gym. I have always gotten bored with weight training, and figuring out a workout schedule that matches up with the work schedule and family schedule has always been different.
Nonetheless, we decided to give it a shot. My wife has always been a runner, but right now she is 6 months pregnant, and she needs some other ways to continue to exercise. So, we agreed to try a 3 month gym membership a try.
So far, this time around has been different. For starters, the first day there, the salesman-trainer who signed us up, went the extra mile and set me up with a lifting routine that I can do in about 40 minutes. It gives me purpose when I walk in.
Secondly, I started going to spinning classes. Now, as a cyclist, there has definitely been a brain shift I have had to do. Spin bikes are definitely not the same as a road bike on a trainer in the basement. Spin bikes feel very little like the real thing. However, I leave every session dripping in sweat, and legs on fire. I guess it's working.
Today I'm about 15 days into my 3 month trial membership. Right now I'm digging it. Let's see how I feel in a month or so.
Right now I'm just glad it's working out!
I joined a gym this month to see what I have been missing out on. Really, I have never been much of a gym rat, but my wife Erin is due with our 4th in March, and she needs a place to work out that isn't as strenuous on her body. Things like yoga classes, and running on the elliptical rather than hiking and jogging are perfect for her right now.
The gym has a pretty good sized spinning room with 40 or so bikes, which caught my interest. I wasn't sure what to expect, but I was pretty excited about it, because I have heard a lot of good things from people about spin classes.
Spin class is NOT cycling.
I was glad to see that the bikes allowed me to wear my clipless shoes and lock in. I thought it was pretty cool that we would be watching cycling on the big screen while we spun away. But I was really confused by how to make this spin class feel right. The hardest thing to get used to was the tension settings. I never knew how hard to set it on. The instructor would say "adjust to your 5," and "now we'll ramp it up to your 6.5." I couldn't determine where those levels might be for me. I was certainly strong enough to spin a tougher number at times, but how hard was I supposed to be working? It was all new to me.
The biggest adjustment was how long the instructor would have us out of the saddle to climb. First of all, If I was standing at my level 6 I would nearly fall off the bike. I had to ramp it up to my level 7-8 just to keep enough back pressure to stand on the pedals. Then when we'd sit back down I would have to ease of the tension just to spin along, while everyone else seemed ok with keeping to tension the same in a seated position.
Here's the thing, on the road you never stand for more than a 30 second burst at the most. We are watching videos of cycling giants climbing the Alps, yet not one of them is standing. Why are we standing for 5-7 minutes?
Here's my conclusion. Spin class IS very good for you.
First, everyone I got raving reviews from about spin class was a non-cyclist. I should have noticed that.
Second, this was not cycling, but it works. I walked around all day with new aches and pains and different fatigued muscles. I was dripping with sweat, and polished off a full water bottle without hesitation. I don't typically do that in just a 1 hr training session on the bike.
Want to get an amazing workout? Try a spin class. Want to challenge your body in every way? Get a good bike and get out there!

I'm still struggling though the details when it comes to having the proper rain gear. I feel really good about a few things
1. the waterproof pants I have now keeping my dry and breathe well.
2. and a pair of rubbers to slip over my shoes. Both of those are working beautifully.
3. As I said in an earlier post, my ski helmet and goggles work really well in any cold weather, but they also perform nicely in the rain as well.
It's my upper body I can't get figured out. I have two "waterproof" or at least "windproof" coats that just aren't cutting it. They hold up for 5-10 minutes, but after that I begin to get that damp icky feeling on my arms and across my chest where the rain hits most directly.
I'm still trying to work it all out. The picture above is of all my gear drying out in my office. What I may have to do is have a change of clothes in a waterproof bag with me... This is because the more waterproof the gear is, the warmer I get while spinning the pedals along. My innermost layer was pretty wet today.... and I can't tell if it got that way from the outside in, or from the inside out.... geesh!
I have spent the last few days searching the web for good resources on wet weather commuting. Here is a list of useful links I came across.
http://www.thirdwave-websites.com/bike/rain-capes.cfm
http://www.rei.com/expertadvice/articles/commuter+bike+gear.html
http://www.commutebybike.com/2007/10/16/my-rain-gear/
http://www.drivelesssavemore.com/pages/wet-weather-biking-gear
Problem is, I can't decide what to do. I have only about a 3-4 mile commute, so getting totally decked out doesn't make a lot of sense. Similarly, being under-dressed makes for a long day at the office. So, I ran to the hardware store this morning to buy some rubber booties as a start. Then I had second thoughts about them, because I expected them to allow too much water to splash up around my pant-legs. I took them back.
The point of the matter is, the only piece of wet weather and winter gear I am sure of, is my snowboarding helmet with goggles. It keep me warm, it keeps the wind out of my eyes, and my wife thinks its sexy...

Tons of people ask me what kind of bike they should buy, then tell me three days later that they bought the bike from Walmart I told them not to bother with, because "the price was right."
Please stop doing this! Granted, if you only want a bike to ride a few times a year down the sidewalk or a rails to trails system, go for it. You aren't serious about buying a bike anyway. But if you want to buy a bike that might be useful to you at all in the future, look on craigslist.
Step one: Figure out what size bike you need.
Mountain bikes are sized in inches, and road bikes are sized in centimeters. You night want to swing by your local bike shop and try out a new bike or two just to find out what size fits you best.
Step two: Determine what type of riding you intend to do.
Mountain bikes are great for the single track, but really heavy and cumbersome for most other situations. Know where you are hoping to ride.
Step three: Do your research. Learn which namebrands are quality, and look for those models first.
Step four: Look on craigslist in your local area. Know that there are no guarantees on anything, but also know that you should save at least $100-$200 on the good quality bike that is just a couple years old. Also, make an offer. Barter. The price is only what someone is willing to pay.
Step five: Sell your old bike on craigslist. Everybody's garbage is someone else's treasure. I have bought quite a few treasures along the way!
Disclaimer: I love being able to buy bikes this way. Out of the 8-9 kids and adults bikes in my garage, only one was bought brand new. We looked though... for a solid month. Sometimes the right bike just doesn't surface. But 8 out of nine isn't too bad!
One of my favorite blogs to check every day is Jonathan Pait's www.lowcadence.com It is a biking blog from a cyclist in Greenville, who rides daily and continues to blog about it daily. That is one of the hardest things of all to do: continue to blog about it daily.
Nonetheless, Jonathan is embarking on an epic ride across the state of SC at the end of the month. I find this ride particularly interesting, because he is doing the ride to raise support for a CHD (Child Heart Defect) child that was in the hospital with my son Josiah before he passed away. If you do not know our story, check it out at www.thewilsonheart.com
My son Josiah was flown via helicopter from Greenville to Charleston, SC. Planning a ride on that route was something I had hoped to do myself. Now that Jonathan is riding the route, and doing it for a cause I am personally passionate about, my interest is peaked. Jonathan is riding the 240 miles in a single day, for Rebekah Grace Ellis, a little girl who fights for every breath, and every heartbeat, every single day. Her story, and her family is absolutely amazing.
Please visit this website, where you will learn more about little Rebekah Grace and consider donating to support Jonathan in this epic trek across the state.
One of the greatest frustrations with any receiver mounted bike rack is the inability to open the rear hatch on your vehicle. I built this bike rack in stages, but I am very happy with the finished product.
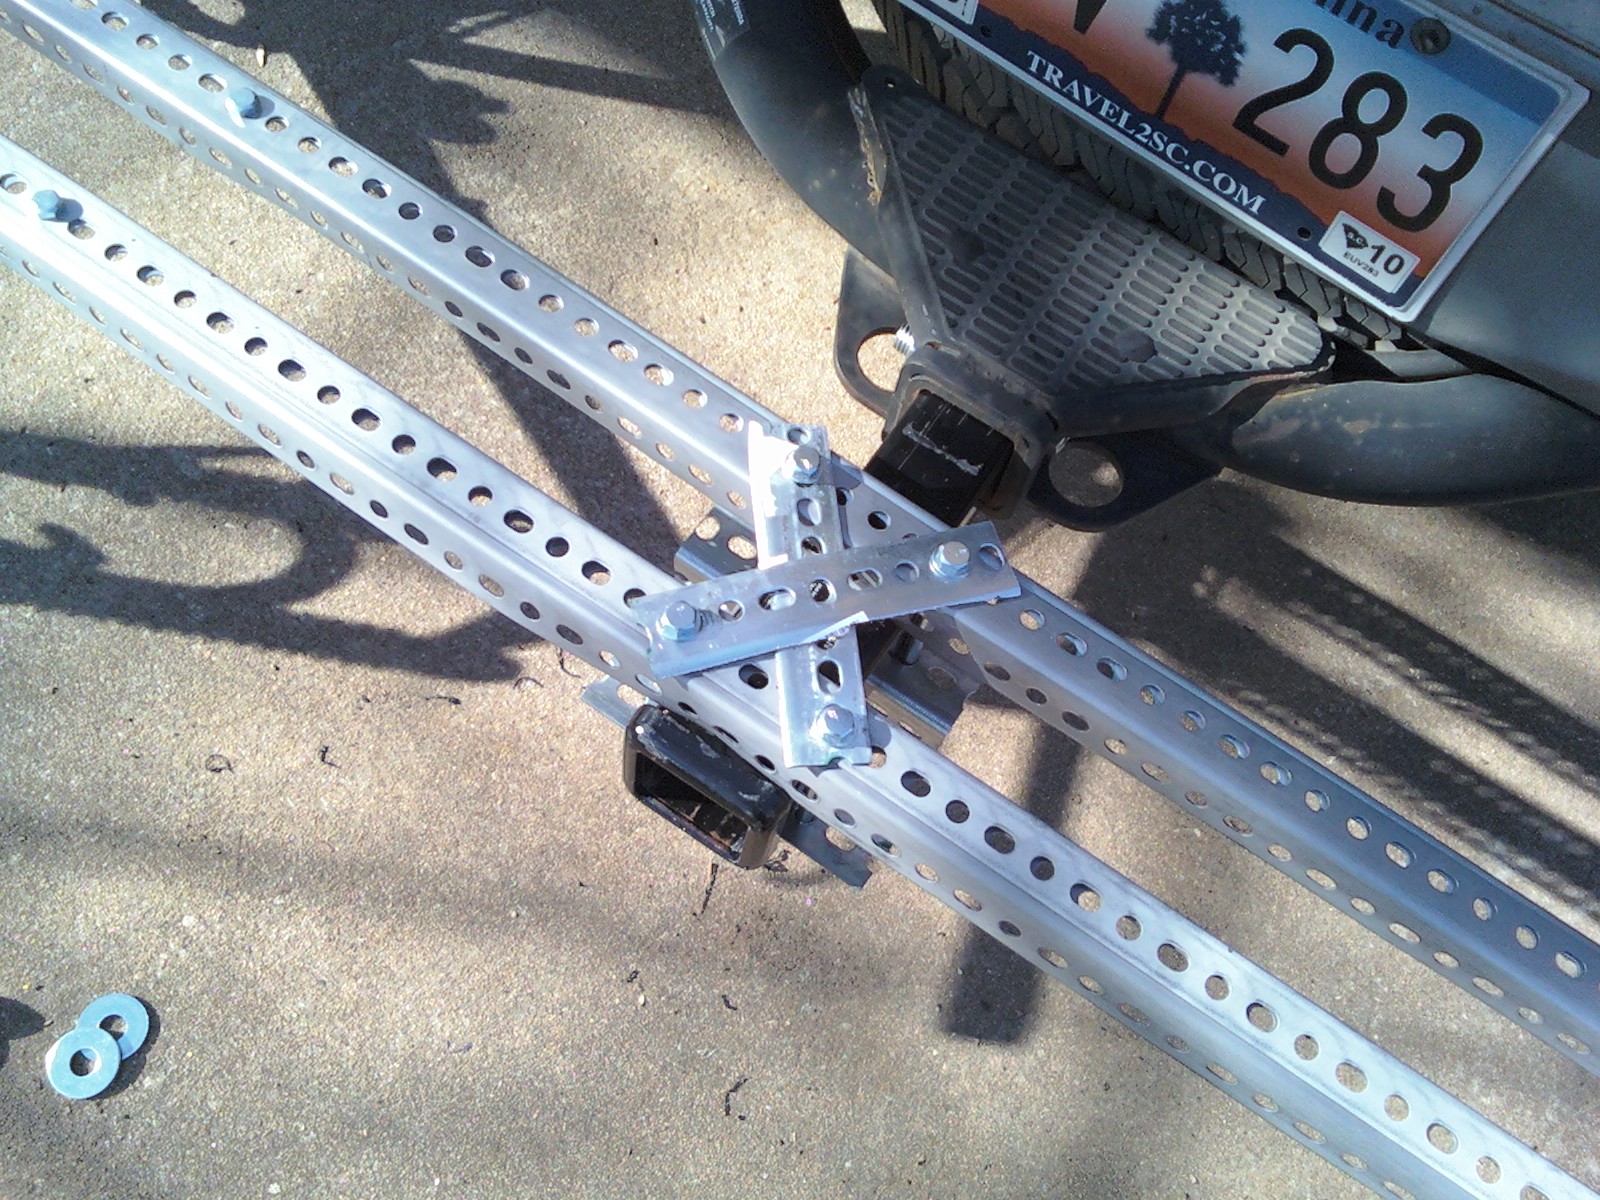 |
| The rack is built around something called a hitch extension bar. They are typically used for a pickup truck that has a camper on the back, and needs the towing hitch extended. The one that I used is 18inches long, and fits in my 2 inch receiver hitch. |
 |
| From there, I built a frame for the rack using angle iron. Since these pictures were taken, I have switched out the angle iron for boxed steel crossbars which are much stronger. |
 |
| The rack is held in place by a clamping system. It is based around the idea that bikes are somewhat balanced weight. Four long bolts are tightened down snugly to create a tight clamp around extension bar. |
 |
| After that, I added two toolboxes for carrying biking helmets, random tools, a change of clothes, tie-downs, and a first aid kit for the inevitable crash. These toolboxes are water tight, and would apparently done a great job of keeping out the moisture until I drilled four holes into the bottom to mount them on the rack. I advise you to caulk them well so your equipment doesn't pick up moisture and rust. I didn't do this, and had no problems with one of them, but have a rusty socket set in the other |
 |
| I added a yakima wheelstrap for the rear tire |
 |
| and this is a Saris fork mount on the other box for the front wheel. |
 |
| This toolbox has a wedged groove running the length of it that makes it perfect for a bike tire. Truth is, when the tire strap is attached, the groove is irrelevant... but it looks cool! |
 |
| So, If i just want to carry one bike and have all the equipment I need with me, here it is, and away I go. (Although with this set-up I still can't open the rear hatch. I do have more space in the back for cargo though, because my gear is all in the toolboxes instead. |
 |
| This is where it gets fun. You see, up til now, all of this could have been done using a basket carrier rack. But, because we used the hitch extension, now we can add whichever type of carrier hitch rack you already have. In my case, this is a 4 bike rack made by outfitter. |
 |
| So, I can now carry up to four bikes on the standard rack, plus one on my new rack we just built, without giving up roof rack space for kayaks. |
 |
| This is a rack that also included a towing ball option, so in theory you could pull a utility trailer along behind as well. I wouldn't recommend more that a load of leaves however, because all of this is beginning to add up to a significant amount of weight on the rear of the vehicle. |
 |
| Again, if you do want to be able to open the rear hatch without moving bikes around, you would not have the white bike in place. Just carry around the other four bikes. |
 |
| Here is the side view of a full load. This was a day that we took a bunch of students our for a mountain bike riding adventure on their spring break. |
 |
| And here we are from the rear. Without question, it was a full load. But I had room for everyone who wanted to come! |
No one likes to bike in the rain. Having some of the proper gear can help the process be less miserable, but overall you really have to decide ahead of time that training hard will require some discomfort.
More than anything else, the clothes I am wearing are to help keep me warm. I know I look ridiculous. I have accepted this and continue to go out there. I hope I am visible to motor vehicles. this is the only way I will continue to be able to ride in all types of weather. Here is the video blog post. enjoy!
watch on youtube
I ran my 1st half marathon this year, and it really kicked my butt. I have been biking now consistently for a number of years, but training to run really did me in. I don't know whether it is the pounding on the body that every runner experiences, or bad running form on my part for longer distances than 2-3 miles, but I am still hurting from the run 3 weeks later. Here are a few things I learned running my 1st half.
1. I lost 8-10 lbs training for this run. I have never really lost weight biking.
2. There are far more runners out there than cyclist. people resonate with what you are training for.
3. It is absolutely miserable to run 13.1 miles alone.
4. Having a written down training plan is very helpful in getting yourself prepared.
5. I am a long ways off from being ready for a full marathon (26.2).
watch on youtube
I got out this morning on the "good" bike and it felt really good! I have been riding a beater bike to work through most of the winter here in Buffalo, but it definitely feels good to be on a bike. The surprise of the morning was the crazy gusts of wind. It blew me all over the place! I rode an easy 15 miles, in just under an hour.
Most of the ride was on the Amherst bike path, but the fist 2 miles or so were on the road from my house. I was really surprised at how rough the road felt to me. While it was nice to have a big wide shoulder to ride on, the brutal winter has definitely left its mark in potholes and large cracks in the road.
Here is a map of my ride. Look for more to come soon! The weather is improving...
Mike Measer dogs me out bad for my previous video on winter bike riding. He is doing a great job of making me look foolish. Great work Mike!
watch on you tube
Riding in the snow can be miserable, but it can also be a ton of fun. This bike setup probably wouldn't work to well out on the trail, but it is working pretty good on the snow and slush covered roads of Buffalo. I highly recommend using a bike that you are not terribly fond of, because the salt just eats away at it. Also, the headgear and lights are not a joke, because cars are not used to seeing a bike in these conditions. It may not be safe for you to be out there if the car can't see you far enough in advance.
I can't tell you how much I have been enjoying my commute. It's nearly the end of Feb now, and I have 2 months of commuting under my belt, in some of the worst conditions imaginable. Yet, its all manageable if you have the right gear!
What I can't seem to find is a riding buddy...
watch on youtube
This is a little video showing the newly mounted roof rack. I had the cross bars for this rack for a number of years, and have used them in many variations of bike racks. My wife uses the Xterra right now for her main transportation, so the bike rack off of the trailer hitch was getting in her way for groceries and stuff.
The front crosspiece bolts right into the existing mounts for the factory basket on the roof. It required going to a hardware store for the exact match on a new bolt that would be long enough to go through the crossbars. The bolt is fine thread and metric, which makes it difficult to match, but the guy at the hardware store was able to do it in just a few minutes.
The rear cross piece required drilling through the factory rails, which I would have preferred not to do, just because it makes it pretty permanent. However, this is a budget rack, and buying the clamps from Yakima would cost nearly $100 apiece, so the $1.75 I spent in hardware was a great alternative.
Here is the video. Sorry I did not shoot it in landscape mode, I was still trying to get used to me new iPhone.
watch on youtube
So if you are reading this post, it would mean you are already considering a ride to work on a very cold day. I am rooting for you! Get out there and do it! Here are just a few things for you to consider.
Dress for It
Long Underwear - don't leave home without it.
Ski Helmet - best Christmas present I got this year.
Ski Goggles - your face will freeze without them.
Tall Snow Boots - they are ugly, but the taller the better. Leave an extra pair of shoes in the office.
Fleece Vest - the high collar will keep your face warm, and the vest will keep the mud off your jacket
Backpack - it can carry your stuff, but it will also keep you warm
Have The Right Gear
Mud Flaps - well worth the $20
Milk Crate - good for storage, and doubles as a rear mudflap
Headlamp - it gets dark really early in the winter
Taillight - I mount it on the back of my helmet
The Right Bike
Older is better - the road salt will do a number on your components... please don't use your new bike
No Clipless pedals - the ice is too slick, and the shoes aren't warm enough... don't bother
Knobby Tires - the snow and ice is slick, put on the fattest ones you can find
Low Air Pressure - even the best tires don't have much tread on the sidewalls
Adapt Your Riding Style
Stay Seated - in order to keep traction, you need to keep weight on the rear wheel at all times
Higher Gears are Better - while a lower gear gives you more torque, it will spin the tire. Grunt it out!
Keep it Straight - while learning to avoid obstacles is normally part of good riding technique, riding in a straight line is even better technique in the snow. ride right over the clumps of snow, and you will keep it upright for longer.
Be Considerate To Traffic
They Don't Expect You - remember that a biker in the snow is totally unexpected
Be Visible - they need to see you a long ways off
Its Ok To Be There - I have found it to be much more dangerous on a jagged sidewalk, than the shoulder of the road. Just keep it smooth and steady, with no sudden movements, and no one gets hurt.
Have Fun!
Ok, so I really did it today. Today I rode to work in about 3 inches of snow, and I loved every bit of it. The trip is about 2.2 miles in length, but in the swirling snow and 25 degree with a 12 degree wind chill, it feels much worse. I have really tried to make the point that if I really want to call myself a cyclist, I need to be willing to ride in any climate, no matter what.
So, to get geared up, I asked for a snowboarding helmet for Christmas, so that I would have the proper headgear for the brutal weather we occasionally get around here. My 1st few rides to work were last week, which ended up being a balmy 55 degrees and sunny. This was very uncharacteristic of our area, so I couldn't be too surprised when the weather turned sour.
Last week, it became apparent that the wind really chills on my face, even though I was suited up with layers of warm clothing everywhere else. So today I headed out with full ski goggles, thermal underwear, socks, ankle boots (clipless pedals are great, but icy conditions require an even faster dimount, and they arent warm enough) an gloves. I have a new backpack for my laptop, and other office stuff, which is nice, because the weight of it also functions as a layer of warmth on my back. I was toasty warm... for a while.
Another nice thing about riding in a northern climate is that the roads have a shoulder on them. In the south, I got used to riding on just a few inches of "shoulder" while cars went whizzing by. Here, because of snow removal, the roads boat of 4-6 ft paved shoulders that have plenty of room for any cyclist to enjoy. About 1.5 miles into the ride, the side of the road got slushy. This is worse than snow, and is caused from the salt they spread on the road to make driving conditions safer for the motorists.
I guess I crossed over onto a street that had been more heavily salted by the city, and it became slushy and rapidly nasty. Within minutes I could taste road salt all over my face, my chest was covered in mud splatter, and my butt was soaking wet from the rear tire throwing muddy ice all over my backside. Nearly 6 hrs later, my underwear is still a little soggy, and my boota are moist, and my pants are cached in mud. A few adjustment need to be made.
My buddy at work, Darrick, commented on my appearance when I walked in, and I told him that this was still in the "trial and error" phase. He suggested that perhaps I was just in an "error" phase. 1st things 1st, I need a mudflap.
Thankfully, my friend Will saw my twitter post on face book and offered me the following solution. Looks like a good option to me! I'll have to check it out another day. Today I am going to get picked up from work rather than make the sloppy return trip!